Introduction
Few automotive service experiences are more frustrating than picking up your vehicle after a professional wheel balancing, only to feel that familiar steering wheel shake return the moment you hit highway speeds. That persistent vibration signals something went wrong in the balancing process or the tire-wheel assembly itself.
Post-balancing vibration is rarely random. It typically points to specific, fixable causes: improper balancer mounting, incorrect or failed wheel weights, undetected tire or rim defects, or underlying suspension problems.
Each of these issues compounds over time — driving uneven tire wear, stressing suspension components, and reducing vehicle stability at highway speeds. This article breaks down why vibration persists after balancing and what needs to happen to actually fix it.
TL;DR
- Post-balancing vibration usually stems from errors during the balancing process itself, not just the wheels
- The most common culprits: improper wheel mounting on the balancer, incorrect or failed wheel weights, and undetected tire or rim defects
- Worn wheel bearings or suspension components can mimic balancing-related vibration
- Prevention starts with proper technique, quality weights, and inspecting the tire-wheel assembly before balancing
Common Causes of Wheel Vibration After Balancing
When a wheel balancer displays "zero" but vibration persists on the road, the discrepancy almost always stems from one or more root issues in equipment, materials, technique, or the tire-wheel assembly itself. Each cause below points to a specific fix—so identifying the right one avoids repeat comebacks.
Improper Wheel Mounting on the Balancer
The most common source of post-balancing vibration is improper wheel mounting during the balancing process, accounting for approximately 60% of vibration-related comebacks. When a technician uses the wrong cone or collet size, or fails to back-cone mount the wheel, the tire-wheel assembly can shift on the balancer shaft during the spin. This shifting produces false imbalance readings and incorrect weight placement.
Modern alloy wheels feature complex taper angles that require matching low-taper collets for accurate centering. If the cone doesn't support the wheel on its structural taper, the assembly will wobble during measurement, giving readings that change with each spin.
The repeatability check is your diagnostic benchmark: spin the wheel, note the weight amounts and locations, then spin it again. If the balancer recommends different weights or different positions, the wheel wasn't properly centered. Consistent, repeatable readings across multiple spins confirm correct mounting.
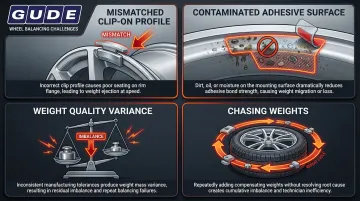
Wheel Weight Problems: Wrong Type, Poor Adhesion, or "Chasing Weights"
Wheel weights fail in three primary ways, each creating new imbalance after the vehicle leaves the shop:
- Mismatched clip-on profile: A "P" weight designed for steel rims won't properly grip an "MC" or "FN" alloy flange. The weight sits loose, shifts, or flies off at highway speeds. SAE J1986 standardizes these profiles, but only when technicians match them correctly to rim geometry.
- Contaminated adhesive surface: Adhesive weights need at least 80% tape "wet-out" to hold. Brake dust, oil, old adhesive residue, or mounting lubricant on the rim blocks proper bonding, causing weight migration or loss within days.
- Weight quality variance: Weights with inconsistent mass values—due to poor manufacturing tolerances—introduce errors that no technique can correct. ISO9001-certified weights, such as those from GUDE Corp, reduce this variable by ensuring accurate, consistent weight values across every unit.
- "Chasing weights": When the balancer keeps calling for more weight without reaching zero, the wheel usually isn't seated correctly on the balancer—not a tire defect. Stop, remount using proper back-coning technique, re-zero the machine, and start fresh.
Undetected Tire or Rim Defects
Standard spin balancers measure only mass imbalance—uneven weight distribution around the tire-wheel assembly. They cannot detect force variation, which is stiffness irregularity within the tire structure itself.
Tire defects that cause force variation include:
- Internal belt separation (often invisible from the outside)
- Flat spots from prolonged parking or hard braking
- Sidewall bulges indicating structural damage
- Manufacturing inconsistencies in sidewall stiffness
A tire with 30 lbs of radial force variation can cause the same vibration as 1.5 ounces of imbalance at 50 mph, yet a standard balancer will read "zero" because the weights are correctly distributed. The tire is balanced, but it's not uniform.
Rim issues that persist regardless of balancing:
- Bent or out-of-round rims from pothole impacts
- Corroded bead seats preventing proper tire mounting
- Cracked wheels that flex under load
Road-force balancers or a thorough visual and physical inspection before mounting can identify these issues before weights are applied.
Non-Balancing Vehicle Issues Mistaken for Imbalance
Worn wheel bearings, loose tie rods, worn ball joints, and brake rotor runout all produce vibration that closely mimics wheel imbalance—often showing up in the same 55-70 mph speed range.
Key differentiators:
- Wheel bearings: Produce a low rumble or grinding noise that changes with steering input; vibration may worsen during turns
- Tie rods and ball joints: Create loose, wandering steering feel alongside vibration; often accompanied by clunking over bumps
- Brake rotor runout: Vibration worsens specifically under braking; caused by lateral runout and disc thickness variation, not imbalance
A road test with speed-specific vibration analysis is needed to differentiate these sources from true wheel imbalance. When the root cause is a worn suspension component or rotor, adding weights only masks the symptom—the underlying issue remains and the vibration returns.
What Happens If Post-Balancing Vibration Is Ignored
Ignoring post-balancing vibration doesn't just cause discomfort — it accelerates damage across multiple systems:
- Tire cupping and premature wear: A tire just 1 oz out of balance at 60 mph exerts 7.73 lbs of force per revolution, causing the tread to bounce and develop scalloping patterns that shorten tire life by thousands of miles.
- Bearing and suspension wear: Mechanical imbalance is up to 50% more destructive to wheel bearing life than other vibration sources at equal levels — and it puts the same oscillating stress on ball joints, tie rod ends, and strut mounts.
- Longer stopping distances: Tire hop interrupts consistent road contact, reducing braking effectiveness and slowing emergency response at highway speeds.
- Higher fuel costs: NHTSA-funded research shows a 10% drop in rolling resistance improves fuel economy by 1-2%. Persistent vibration does the opposite — it increases rolling resistance and forces the engine to work harder.
Left unaddressed, these issues compound quickly. Here's how to tell whether the original balance service is to blame:
Warning Signs Your Wheels Were Not Properly Balanced
- Speed-specific steering wheel shudder: Vibration felt in a narrow speed range (55-70 mph) that eases at higher or lower speeds indicates 1st-order tire/wheel imbalance
- New or worsening tread cupping: Scalloping patterns appearing within weeks of the balance service confirm the tire is still bouncing
- Immediate return after highway driving: Vibration that returns or worsens after the first highway trip post-service suggests weights shifted or fell off
How to Fix Wheel Vibration After Balancing
Fixing post-balancing vibration requires a systematic diagnostic and correction process, not simply re-spinning the wheel and adding more weights.
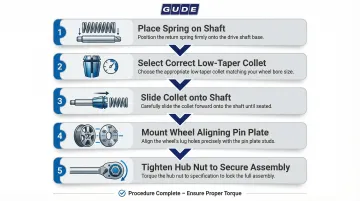
Correct the Wheel Mounting Method on the Balancer
Back-coning procedure (step-by-step):
- Place the spring on the balancer shaft
- Select the correct low-taper collet that fits snugly into the back of the wheel's center bore (not the front)
- Slide the collet onto the shaft
- Mount the wheel, aligning the pin plate with the lug holes
- Tighten the hub nut to secure the assembly
This mirrors how the vehicle's hub centers the wheel, ensuring the balancer sees the same geometry the road will see.
Pre-weight spin check: Run an initial spin to confirm imbalance readings, then immediately run a second spin without touching the wheel. If weight amounts and locations are consistent across both spins (within 0.05 oz and 5 degrees), the wheel is properly centered. If readings vary significantly, remount and repeat before adding any weights.
Choose the Right Wheel Weights and Prepare the Surface
Matching weight type to wheel type:
- Clip-on weights: Use a rim gauge to match the correct profile to the rim flange geometry. Common profiles include P (standard steel), MC (domestic alloy), FN (Japanese alloy), IAW (European alloy), and T (light truck). Applying the wrong profile creates a loose fit that leads to weight loss.
- Adhesive weights: Require thorough surface preparation to ensure permanent bonding
Weight quality directly affects long-term retention. Lead-free steel weights from ISO9001-certified manufacturers like GUDE Corp are produced to tighter tolerances, which means the weight value stamped on the piece is what you're actually applying—reducing the chance of post-service imbalance caused by weight failure.
Adhesive weight surface preparation (critical steps):
- Remove all old adhesive residue using an eraser wheel or plastic scraper tool
- Clean the mounting area with dedicated wheel cleaner or degreaser (not just water)
- Wipe away residue with a clean, lint-free cloth
- Allow the surface to dry completely (3-5 minutes minimum)
- Apply the new weight and press firmly with a roller or finger pressure (approximately 5 psi) perpendicular to the tape surface
Skipping step 1 or 2 is one of the most common reasons adhesive weights fail within weeks.
Inspect the Tire and Rim Before and After Balancing
Pre-balance physical inspection checklist:
- Check tire for bulges, flat spots, and uneven wear patterns
- Check rim for bends, cracks, or corrosion at the bead seat
- Verify the yellow dot (lightest point on the tire) is aligned with the valve stem to minimize total weight needed
- Measure radial and lateral runout if vibration history exists
When to escalate to a road-force balancer: If standard dynamic balancing yields a zero reading but vibration persists on the road, a road-force balancer is the next step. These machines apply up to 1,400 lbs of force against the spinning tire to simulate loaded conditions, detecting stiffness variations invisible to standard balancers.
Acceptable thresholds:
- Passenger car tires: 18 lbs radial force variation or less
- Light truck tires: 35 lbs radial force variation or less
- Aluminum wheels: 0.030 inch radial runout maximum
- Tire/wheel assemblies: 0.040-0.060 inch radial runout maximum
If these thresholds are exceeded, the assembly requires match-mounting or component replacement.
Rule Out and Address Underlying Vehicle Issues
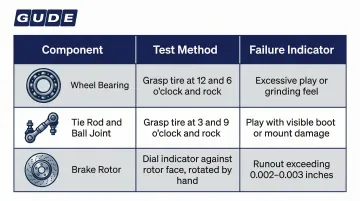
When vibration persists after confirmed-correct balancing, move to a systematic suspension and brake inspection. Each check targets a specific failure mode:
| Component | Test Method | Failure Indicator |
|---|---|---|
| Wheel bearing | Grasp tire at 12 & 6 o'clock; rock it | Excessive play or grinding feel |
| Tie rod / ball joint | Grasp tire at 3 & 9 o'clock; rock it | Play with boots or mount damage visible |
| Brake rotor | Dial indicator against rotor face; rotate by hand | Runout exceeding 0.002–0.003 inches |
Reading the symptom pattern helps narrow the cause quickly:
- Vibration that intensifies specifically during braking points to rotor runout
- Speed-specific shimmy with no braking involvement more often indicates a bearing or suspension issue
Tips for Long-Term Prevention and Control
Preventing vibration comebacks requires consistent habits across every bay and every technician. These four practices reduce the most common repeat-failure points:
- Rebalance on a schedule: Tire manufacturers recommend rebalancing every 5,000–7,000 miles or at each rotation interval. Rebalance immediately after any significant pothole or curb impact, as these can dislodge weights or shift tire uniformity.
- Standardize technician technique: Require the back-coning mounting method and a repeatability spin check on every job — not as optional steps. Consistent technique across all technicians cuts comeback rates.
- Log balancer calibrations: Run calibration checks every 1–2 months or after machine servicing. Track recurring "chasing weights" complaints, which often signal calibration drift or equipment wear before the machine fails outright.
- Source precision-manufactured wheel weights: Use certified weights matched to the specific rim type and vehicle application. Consistent weight material and profile across every service reduces the margin for both human error and weight failure.
Conclusion
Post-balancing wheel vibration has identifiable, correctable causes. Proper mounting technique, the right wheel weights applied to a clean surface, and a thorough pre-balance inspection of the tire and rim resolve most cases.
Approaching each balance job as a complete diagnostic process reduces costly comebacks and keeps vehicles performing reliably. When vibration persists despite correct balancing, systematic suspension and brake inspection identifies the true culprit.
Frequently Asked Questions
Will wheel balancing (weights) reduce vibration?
Yes, properly applied wheel weights correct mass imbalance and eliminate the most common cause of vibration—but only when weights are placed correctly and the wheel is free of defects. Other causes like worn suspension components or tire force variation require additional repairs beyond balancing.
How do I reduce wheel vibration?
Start with these steps:
- Balance wheels dynamically using correct mounting technique and quality weights
- Inspect tires and rims for defects
- Check suspension components if vibration persists after balancing
A road-force balance may be needed if the standard balancer reads zero but vibration continues.
What happens if you put too many balancing beads in a tire?
Excess beads can clump together and create the same vibration problems they're meant to solve. Too much weight concentrated in one area causes imbalance rather than correcting it. Always follow the manufacturer's recommended quantity for your specific tire size.
How do I know if my wheel balancing was done correctly?
After a proper balance job, there should be no steering wheel vibration at any highway speed. A test drive at 55–70 mph with no shimmy confirms the job is done. The shop should also be able to show a zero or near-zero reading on the balancer readout.
Can worn suspension cause vibration even after balancing?
Yes—worn wheel bearings, loose tie rod ends, and worn ball joints produce vibration that closely mimics imbalance and will not be corrected by balancing. A suspension inspection is the necessary next step when vibration persists after a verified-correct balance.