Introduction
Wheel balancing is routine work — until a customer returns with the same vibration complaint twice. Small, overlooked steps consistently trigger comebacks, steering wheel vibrations, and damaged shop credibility. Industry data shows that approximately 60% of vibration-related tire service comebacks stem from improper wheel mounting or balancing procedures, not equipment failure.
Speed and volume pressure during peak season create shortcuts. Those shortcuts add up — for the vehicle and for your shop's reputation. A wheel mounted just 0.010 inches off-center on the balancer shaft produces a 0.85-ounce static imbalance when reinstalled, even if the machine reads zero.
This article covers the five most common wheel balancing mistakes, why they happen, and the specific corrections that prevent them—including how weight selection plays a larger role than most technicians realize.
TLDR
- Most wheel balancing failures trace to skipped prep, improper mounting, wrong weight selection, or uncalibrated machines
- Each mistake triggers direct consequences: vibrations, uneven tire wear, suspension stress, and costly rework
- Matching wheel weight type and material to the specific rim is critical to achieving a lasting, accurate balance
- Most mistakes disappear through a consistent pre-balancing checklist and scheduled calibration
- Properly specified wheel weights are a low-cost component with an outsized impact on balance accuracy and tire longevity
Why Poor Wheel Balancing Is Costly
A single balancing error doesn't stay contained—it cascades. Research shows unbalanced tires can reduce tire life by up to 20%, with persistent imbalance causing lateral bouncing during rotation. The downstream effects compound quickly:
- Steering wheel vibration, typically felt between 55–70 mph
- Accelerated and uneven tread wear
- Added stress on shocks, bearings, and suspension joints
- Increased risk of premature component failure
At the shop level, rework consumes time that could have been billed to a new job. A customer who experiences one balancing failure is unlikely to return, creating long-term revenue implications beyond the single service. Negative online reviews compound the damage — unresolved vibration complaints are among the most common driver grievances after tire service, and they trace back to process failures, not equipment limitations.
The Most Common Wheel Balancing Mistakes
Mistake 1: Skipping Pre-Balancing Preparation
The balancer can only measure what it receives. A wheel mounted with residual dirt, rust, old adhesive residue, or stones in the tread introduces false data. The machine reads contamination as part of the wheel's mass distribution, leading to incorrect weight recommendations.
Essential pre-check steps include:
- Verify tire pressure – Incorrect inflation affects mass distribution readings and skews Road Force Variation (RFV) measurements, as load rollers rely on exact sidewall stiffness
- Remove tread debris – Stones, mud buildup, or foreign objects inside the tire cavity alter centrifugal force during spinning, triggering repeated incorrect weight requests that never resolve
- Clean hub and rim surfaces – Thoroughly remove rust, corrosion, and old adhesive from both the hub face and rim bead area; even unevenness equivalent to the width of a business card causes vibrations
- Inspect for damage – Check for bulges, sidewall damage, or incomplete bead seating that mimics a bent rim
- Remove old weights completely – All previous wheel weights must be stripped before re-balancing to prevent the machine from compensating for existing corrective weights

The Tire Industry Association (TIA) and Automotive Service Excellence (ASE) mandate these pre-balance protocols as industry standards, not suggestions.
Mistake 2: Improper Wheel Centering on the Balancer
Mounting the wheel off-center on the balancer spindle—even slightly—produces eccentric rotation that the machine interprets as imbalance. This causes technicians to apply weights that address a mounting error, not a real imbalance, so vibrations persist after driving.
Correct mounting approach:
- Select the appropriate cone or adaptor for the specific hub bore—standard cones often don't fit modern complex hub bores
- Always back-cone mount the wheel by placing the cone or collet on the back side; the back of almost all wheels is machined for centering, while the front is often cosmetic
- Ensure flush seating against the flange with no wobble before spinning
- Replace worn cones immediately rather than attempting to compensate for their degradation
- **Use flange plates (pin plates) for chrome-clad and alloy wheels** to prevent cracking plastic cladding and ensure even force distribution across lug holes
Front-coning is a major culprit of centering errors and should be avoided except in rare cases where the inner surface is damaged. For modern alloy wheels, low-taper collets that support the wheel on its structural taper are essential for accuracy and wheel protection.
Mistake 3: Selecting the Wrong Wheel Weights
Not all wheel weights are interchangeable. Using a clip-on weight on an alloy rim that requires an adhesive weight can scratch the finish, cause corrosion at the contact point, or result in the weight detaching during driving. Conversely, using an adhesive weight in a high-stress location without proper surface preparation causes premature failure.
Weight material matters beyond aesthetics:
Nine U.S. states and Canada have strictly banned the sale and installation of lead wheel weights, with California imposing $2,500 per day fines for non-compliance. Lead-free alternatives—zinc and steel—are now the standard for compliant and professional service.
Key considerations:
- Clip-on weights grip the rim flange and are common for steel wheels
- Adhesive weights are placed on the inner barrel and are standard for alloy, aluminum, and low-profile rims where the flange cannot accept a clip without damage
- Lead-free steel weights offer better corrosion resistance, meet environmental regulations, and match or exceed lead weight performance
Using mismatched weight materials introduces corrosion risk and inconsistent mass properties that undermine long-term balance. For shops servicing OEM and premium vehicles, lead-free weights are increasingly required by manufacturer specifications.
Mistake 4: Poor Weight Placement and Inadequate Surface Prep
Even a correctly selected weight will fail if placement is rushed. Adhesive weights applied to a greasy, dusty, or damp surface will not bond correctly and can detach at highway speeds—leaving the wheel more out of balance than before service.
Correct procedure:
- Degrease the rim surface at the adhesion point after cleaning — the surface must be completely clean, with no brake dust, grease, or old tape residue
- Allow surface to dry completely before weight application
- Apply weight firmly and hold pressure for the manufacturer-specified duration
- Use hidden-weight (SPLIT) programs on the balancer to position weights behind spokes on alloy or premium rims, preserving aesthetics while maintaining precision
Temperature matters: adhesive weights should not be applied in extremely cold conditions, as bonding strength drops significantly below recommended temperatures.
Mistake 5: Neglecting Balancer Calibration and Machine Maintenance
A balancer that hasn't been calibrated recently produces readings that are consistently off by a small but meaningful margin. This causes "weight chasing"—the machine continues requesting more weight after the first application because its reference point is inaccurate.
Recommended calibration intervals:
- Every 1–2 months, or immediately after the machine is serviced or physically moved
- After 8,000 spins (light use) or 12,000 spins (heavy use) for shops with maintenance interval monitors
Essential maintenance checks:
- Inspect belt tension regularly
- Blow out internal dust from sensors
- Check shaft surface for debris or damage
- Verify all electrical connections are secure — loose connections from vibration are a common and easily missed cause of erratic readings
If the balancer asks for weights more than twice, something is wrong with the setup—typically mis-centering, internal debris, or calibration drift.
How Wheel Weight Selection Impacts Balancing Accuracy
Wheel weights are the final correction mechanism—all the precision of the balancer is only as good as the weight placed on the rim. An imprecise, incorrectly sized, or poorly manufactured weight introduces its own variability into a system designed to eliminate variability.
Attachment Types and Applications
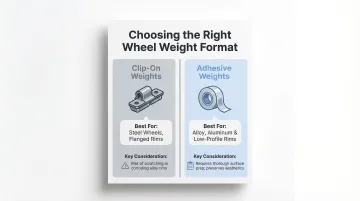
Choosing the right attachment format starts with knowing what the rim can handle:
| Weight Type | Best For | Key Consideration |
|---|---|---|
| Clip-on | Steel wheels, flanged rims | Can scratch or corrode alloy rims not designed for clips |
| Adhesive (sticker) | Alloy, aluminum, low-profile rims | Requires thorough surface preparation; preserves wheel aesthetics |
Weight Granularity and Precision
Balancers capable of 1-gram precision require equally precise weights to deliver on that capability. Using weights measured in coarser increments defeats the purpose of high-precision equipment and leaves residual imbalance. Most wheel balancers use software with fixed dynamic blinding of 0.29 ounces per plane, which can display "0.00" while leaving up to 0.58 ounces of hidden residual static imbalance, causing high-speed shimmy.
Material Selection and Regulatory Compliance
Precision only holds if the weights themselves are consistent—which brings material choice into the equation. Lead-free wheel weights made from zinc or steel alloys match or exceed the performance of lead weights while meeting environmental regulations. Because steel and zinc are less dense than lead, the physical weights are slightly larger for the same mass, but properly sized and applied, this has no impact on balancing performance.
**GUDE Corp's lead-free wheel weights**, manufactured in ISO9001-certified facilities, meet the precision and material requirements of both OEM and aftermarket applications. Their coated steel construction provides consistent mass properties and corrosion resistance across clip-on and adhesive formats, with product lines including T, MC, P, AW, IAW, and FN clip-on series, plus adhesive rolls and boxes.
Sourcing wheel weights from a manufacturer with documented quality standards—ISO certification, traceable production—reduces the variability that comes from inconsistent aftermarket weight batches. It's a small sourcing decision with compounding impact across hundreds of vehicles serviced per season.
Best Practices for Consistent Balancing Results
Avoiding common balancing errors comes down to repeatable habits. These four practices are straightforward to implement and cover the most frequent failure points in a typical tire service workflow:
Follow a documented pre-service checklist for every wheel, regardless of how routine the job looks. Checklists reduce the impact of time pressure and prevent preparation steps from being skipped during peak-season rushes.
Re-spin after weight application. Run a second measurement cycle after attaching weights to confirm residual imbalance is within tolerance. It takes seconds but catches placement errors before the vehicle leaves the shop.
Calibrate machines on a fixed calendar interval rather than waiting for inaccurate results to appear. Proactive calibration costs far less time than tracing a string of customer complaints back to a drifted machine.
Use static minimization or fine-mode (1-gram precision) to eliminate residual imbalance that standard dynamic balancing with round-off settings can leave behind.
Signs That a Vehicle Was Poorly Balanced
Primary Driver-Reported Symptoms
- Steering wheel vibration – Typically onset between 55–70 mph, indicating front wheel imbalance
- Rhythmic thumping or humming noise from wheel wells during driving
- Shimmy felt through the seat or floor – Indicates rear wheel imbalance; symptoms intensify with speed
Uneven Tire Wear Patterns
Cupped or scalloped tread (scooped patches of worn rubber) rather than smooth edge wear signals dynamic imbalance that has persisted long enough to create uneven contact pressure. Once cupping develops, it cannot be reversed and often forces early tire replacement.
Distinguishing Balance from Alignment Issues
These two problems share some symptoms but have distinct signatures:
- Imbalance: Vibration through the steering wheel, seat, or floor — typically speed-dependent
- Misalignment: Vehicle pulling to one side, plus edge-to-edge tread wear rather than cupping
Confusing the two results in a repair that doesn't fix the actual problem.
Frequently Asked Questions
What is the best type of wheel balancing?
Dynamic balancing is the industry standard for most passenger vehicles because it corrects both static (up-and-down) and couple (side-to-side) imbalances simultaneously. For high-performance or sensitive vehicles, Road Force Variation (RFV) diagnostic balancing provides additional precision by measuring how the tire deforms under load.
How much does it cost to have wheels rebalanced?
Rebalancing typically costs between $15–$25 per wheel at most service centers, bringing the average cost for a set of four wheels to $40–$100. Road Force balancing is more labor-intensive and generally costs $80–$160 for four wheels.
How do I know if my wheels need balancing?
Key signs include steering wheel vibration at highway speeds, rhythmic noise from the wheels, and uneven or scalloped tread wear. Wheels should also be balanced whenever new tires are installed, tires are rotated, or a wheel is repaired.
Can using the wrong wheel weights damage my rims?
Yes. Using clip-on weights on alloy rims not designed for them can scratch the finish and introduce corrosion at the contact point. Adhesive weights applied without proper surface preparation can detach at speed, and lead weights can cause galvanic corrosion on certain aluminum alloys—so material selection matters beyond appearance.
How often should wheels be rebalanced?
Wheels should be checked for balance every 5,000–6,000 miles (typically aligned with tire rotation intervals), after any impact event such as hitting a pothole, and any time vibration is noticed. Regular rebalancing extends tire life and prevents wear on suspension components.