Introduction
Tire vibration ranks among the most frequently reported driver complaints, and when it strikes at highway speeds, improper wheel balancing is almost always the root cause. Research shows that 60% of vibration-related comebacks stem from improper wheel mounting or balancing technique, making this a critical skill for tire technicians and shop owners alike.
This guide covers the full process:
- Identifying vibration symptoms and their likely sources
- Diagnosing root causes before touching the balancer
- Applying proper balancing technique to fix the problem correctly
- Preventing comebacks through repeatable best practices
Whether you're chasing a single customer complaint or tightening up shop-wide balancing procedures, getting these fundamentals right protects your reputation and reduces unnecessary warranty costs.
TL;DR
- Tire vibration at 45 mph and above typically signals uneven weight distribution in the wheel assembly
- Front wheel imbalance causes steering wheel shaking; rear imbalance creates seat or floor rumbling
- Thorough diagnosis before balancing consistently reduces repeat visits and callback jobs
- Back-coning during mounting isolates true wheel runout, making weight placement more accurate and results longer-lasting
- Rebalance every 5,000–6,000 miles to prevent recurring vibration
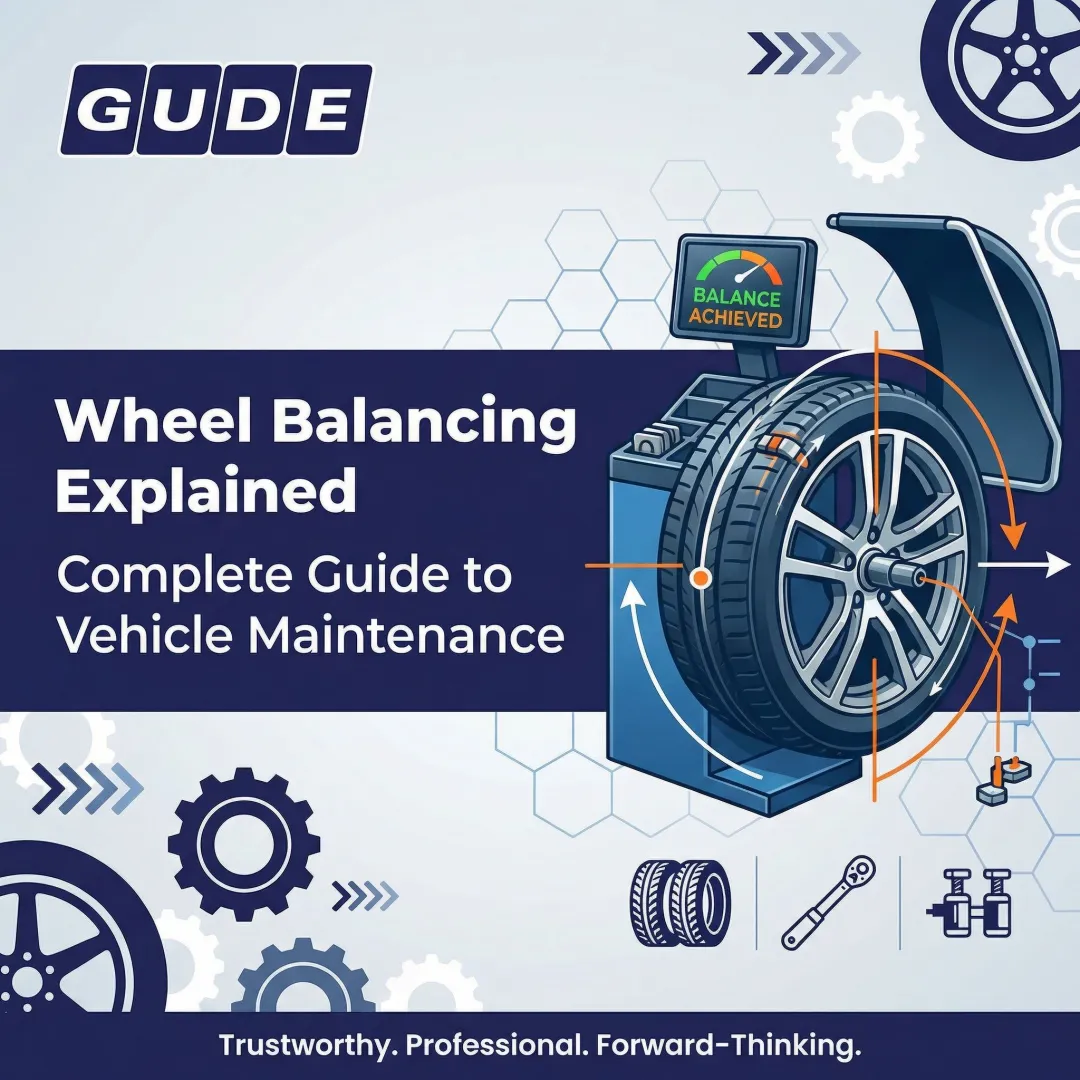
What Is Wheel Balancing and Why Does It Cause Vibration?
Wheel balancing equalizes the mass distribution of a tire-and-wheel assembly so it rotates smoothly around its axis without creating centrifugal force variations. Even a few grams of imbalance amplify into significant vibration forces at speed. According to Hunter Engineering's GSP9720 road force data, just 0.030 inches of loaded radial runout generates the same vibration as 0.75 ounces of imbalance at 70 mph — roughly 30 pounds of road force.
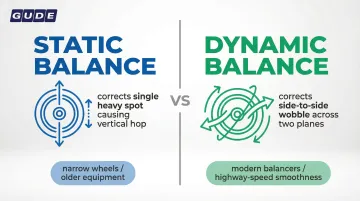
Static vs. Dynamic Balance
| Balance Type | What It Corrects | When It's Used |
|---|---|---|
| Static Balance | Single heavy spot causing vertical hop | Narrow wheels, older equipment |
| Dynamic Balance | Imbalance across two planes causing side-to-side wobble | Modern balancers, highway-speed smoothness |
Modern computerized balancers default to dynamic correction, which addresses both inner and outer rim planes simultaneously. This two-plane approach is essential for eliminating the lateral wobble that becomes pronounced at highway speeds.
Why Balance Degrades Over Time
Wheel balance isn't permanent. Tread wear shifts weight distribution as rubber wears unevenly. Road impacts dislodge weights or bend rims. Temperature changes cause minor shifts in tire shape. These factors make periodic rebalancing essential maintenance, not optional service.
Common Symptoms and Root Causes of Tire Vibration
Most vibration complaints follow recognizable patterns. Identifying where the vibration is felt and at what speed it appears is the first diagnostic step.
Steering Wheel Shaking at 45–65 MPH
This is the most reliable indicator of front-wheel imbalance. The vibration is rhythmic, worsens with speed, and typically smooths out at very low speeds.
A lost wheel weight or uneven tread wear on one of the front tires is usually responsible.
Seat or Floor Vibration at Highway Speeds
When shaking is felt through the seat base or floor rather than the steering wheel, the imbalance is in the rear wheels. Technicians frequently miss this because it doesn't affect steering feel directly.
The triggers are identical to front imbalance — lost weights, tread wear shifts, or mounting errors — just on the rear axle.
Scalloped or Cupped Tire Wear
Uneven patches worn into the tread surface indicate the tire has been bouncing against the road rather than rolling smoothly. This is both a symptom of imbalance and a cause of new imbalance once it develops.
Prolonged operation with unaddressed imbalance drives this pattern — the longer it's ignored, the more uneven the wear becomes.
Speed-Dependent Humming or Droning Noise
A low-frequency hum that increases in pitch or volume with speed points to a vibrating assembly exciting resonance in the vehicle structure.
Likely cause: Dynamic imbalance creates oscillating loads through the suspension and chassis — often mistaken for a failing wheel bearing until balancing is checked first.
Root Causes and Consequences
Common triggers include:
- Lost wheel weights after hitting a pothole or curb (most common)
- Normal tread wear shifting weight distribution
- Improper mounting on the balancer creating false readings
- Bent or damaged rims
- Seasonal temperature changes causing minor shifts in tire shape
Each of these triggers is correctable early. Left unaddressed, the consequences compound quickly:
Ignoring these symptoms leads to:
- Accelerated tread wear
- Damaged wheel bearings
- Stressed suspension components
- Reduced fuel efficiency
- Compromised braking stability at high speeds
How to Troubleshoot and Fix Tire Vibration Through Wheel Balancing
Applying a fix without first isolating the exact problem leads to repeat comebacks. Industry data shows that 60% of vibration-related comebacks stem from incorrect mounting technique or skipping root cause verification.
Step 1: Identify the Vibration Profile
Record three diagnostic data points before touching the vehicle:
- Where the vibration is felt - Steering wheel indicates front wheels; seat indicates rear wheels
- Speed range where it occurs - Imbalance typically peaks between 45–65 mph
- Whether it's continuous or pulsing - Helps rule out brake, suspension, or alignment issues
This narrows which wheels to inspect and rules out problems that tend to vibrate at all speeds or under specific conditions like braking.
Step 2: Inspect for Root Cause Before Balancing
Physically inspect each suspect wheel before mounting it on the balancer:
- Look for missing wheel weights on the rim flanges
- Check tread for uneven or scalloped wear patterns
- Run a hand around the rim to feel for bends or flat spots
- Look for debris lodged in the tread
A wheel with a bent rim or damaged tire cannot be corrected by balancing alone—attempting to do so will result in false readings and another comeback.
Step 3: Mount the Wheel Correctly on the Balancer
Use the back-coning method: place the appropriate low-taper collet on the shaft from the rear of the wheel hub bore, then secure with the adjustable pin plate aligned to the lug holes. This centers the wheel on the balancer the same way the bearing hub centers it on the vehicle, ensuring the reading reflects real-world rotation.
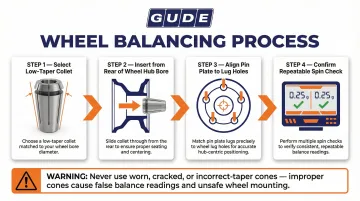
Using a worn cone or an incorrect taper angle will cause the wheel to shift between spins, producing inconsistent or false weight readings. Run a spin check before adding any weights to confirm the mounting is repeatable.
Step 4: Spin, Measure, and Add Wheel Weights
With the wheel correctly mounted, close the safety hood and allow the machine to spin the assembly to operating speed. The balancer will output both the location (clock position) and the amount of weight needed for the inner and outer flanges.
Rotate the wheel to the indicated position and add weights precisely at that point. Even an inch of placement error can require additional correction spins.
Weight quality directly affects how long a balance holds. Lead-free, ISO 9001-certified weights with consistent tolerances and reliable clip or adhesive retention reduce the chance of weight loss causing a repeat complaint. GUDE Corp supplies wheel weights in multiple formats for high-volume shop operations:
- Adhesive rolls (720 pieces per roll in 0.25oz segments) for continuous high-throughput work
- Adhesive boxes (144 pieces with 24 pre-cut strips) for organized bay inventory
- Clip-on series (MC, P, T, AW, IAW, FN) covering steel wheels, alloy wheels, and OEM-specific rim profiles
The T series is built to Toyota OEM rim flange specifications; the AW and IAW series handle alloy wheels where low-profile placement matters.
Step 5: Re-Spin to Verify and Confirm
After adding weights, run a full verification spin. The target is 0.00 on both planes, or within the machine's stated tolerance (typically ±0.25 oz / ±7 g).
If the balancer still calls for significant correction, re-check that:
- The wheel didn't shift on the spindle between spins
- The newly applied weights are fully seated
- The rim dimensions were entered accurately
Persistent large correction values after a second spin point to a structural issue—bent rim, tire uniformity defect, or mounting problem—that balancing cannot resolve.
When to Fix vs. Replace
Not every vibration problem ends with a balance job. Knowing when balancing will actually resolve the issue—and when it won't—keeps your customers satisfied and prevents repeat service visits.
Scenario 1: Lost or Worn Wheel Weight
Rebalance with new weights — this is the most straightforward case. The only exception: if the rim flange is damaged and can no longer hold a clip-on weight reliably, replacement is necessary.
Scenario 2: Bent or Cracked Rim
A minor bend (detectable by hand or dial indicator) may be repairable at a rim shop, after which rebalancing completes the fix. For anything more serious, replace the rim outright.
Replace if the bend is severe, cracking is present, or the bend falls on the bead seat. Ford's OEM position statement specifies that steel or aluminum wheels must be replaced if their structure is altered — welding, bending, or straightening are not approved repairs and compromise structural integrity.
Scenario 3: Cupped, Scalloped, or Severely Uneven Tire
Rebalance if wear is minor and tread depth is still within safe limits. Replace the tire if any of the following apply:
- Cupping is deep or flat spots are permanent
- Tread depth is below 2/32 of an inch (federal minimum)
- The tire deforms unevenly under load despite correct inflation
A tire with structural damage will re-introduce vibration regardless of how precisely it's balanced.
Mistakes to Avoid and How to Prevent Future Vibration
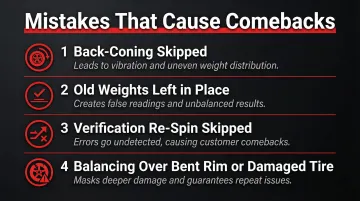
Common Mistakes That Cause Comebacks
- Back-coning skipped — Results in an off-center wheel reading and misplaced weights
- Old weights left in place — Gives the balancer an incorrect starting point
- Verification re-spin skipped — Allows placement errors to go undetected
- Balancing over a bent rim or damaged tire — masks root-cause damage rather than fixing it
Preventive Maintenance Schedule
Balance tires every 5,000–6,000 miles, ideally alongside each tire rotation. The U.S. Tire Manufacturers Association recommends rotating and balancing tires every 5,000 to 8,000 miles.
Some situations also call for rebalancing outside the scheduled interval:
- New tire installation
- Flat repair
- Significant impact (pothole, curb strike)
Drivers who experience a sudden return of vibration between scheduled services should have wheel weights checked first—weight loss from an impact is the most common cause of imbalance recurrence.
Integration with Broader Service Intervals
Build a balancing check into every seasonal tire changeover and after any suspension or steering repair. Disturbing the wheel assembly during those services can shift the existing balance, so a follow-up spin is good practice before returning the vehicle.
Conclusion
Most tire vibration is a solvable problem when the root cause is correctly identified before any weights are added—whether that cause is a lost weight, uneven wear, a mounting error, or rim damage. The difference between a quick fix and a comeback comes down to using the back-coning method, inspecting for structural issues first, and verifying the result with a re-spin.
Catching and correcting imbalance early protects tires, wheel bearings, and suspension components from premature wear, turning a quick balance job into meaningful long-term savings on parts and service costs.
For shops doing high-volume balancing work, using ISO 9001-certified, lead-free steel weights with the correct clip series for the rim type reduces weight loss and keeps customers from returning with the same vibration complaint.
Frequently Asked Questions
Does wheel balancing help reduce vibration?
Yes, wheel balancing directly eliminates the rotational weight irregularities that cause vibration, particularly the rhythmic shaking felt at highway speeds. Most technicians start here when a customer reports vibration.
What are the symptoms of bad wheel balancing?
Key indicators include steering wheel shaking at 45–65 mph (front wheels), seat or floor vibration (rear wheels), scalloped or uneven tire wear, and a humming noise that increases with speed.
Does wheel alignment reduce vibration?
Alignment and balancing address different problems. Alignment corrects the directional angles of the tires and fixes pulling or drifting, while balancing corrects rotational weight imbalance and fixes speed-related vibration. Both affect ride quality but are not interchangeable.
How often should tires be balanced?
The general recommendation is every 5,000–6,000 miles or with each tire rotation. Rebalancing is also advised after any new tire installation, flat repair, or significant road impact.
Can vibration persist after wheel balancing?
Yes, if vibration continues after balancing, the cause is likely a bent rim, a tire with a uniformity defect, worn suspension components, or a mounting error on the balancer. Each requires a separate diagnosis and fix beyond balancing.
How long does a wheel balancing service take?
A standard four-wheel balance typically takes 20–45 minutes. Additional time may be needed if multiple correction spins are required or if pre-service inspection reveals rim or tire issues.