Introduction
Steering wheel vibration after a recent balancing service. Uneven tire wear appearing in just a few thousand miles. These aren't signs of bad luck—they're symptoms of balance weight detachment, a problem that costs tire shops thousands in comebacks and fleet operators even more in premature component replacement.
Wheel balance weights keep each wheel-tire assembly rotating without wobble or vibration — but weight wear-off is far more common and damaging than most technicians realize.
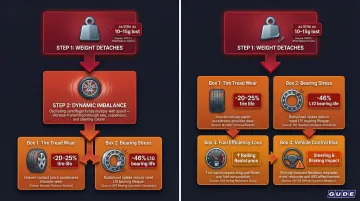
Industry data shows that a 20% increase in dynamic load from an unbalanced wheel reduces wheel bearing life by 46%, turning a $5 balancing oversight into a $500 bearing replacement.
Understanding the specific causes of balance weight detachment—not just the symptoms of imbalance—enables service providers and fleet operators to take effective preventive action. The difference usually comes down to a handful of preventable factors — and knowing which ones are in play determines whether a fix holds for 60,000 miles or fails before the first oil change.
TLDR
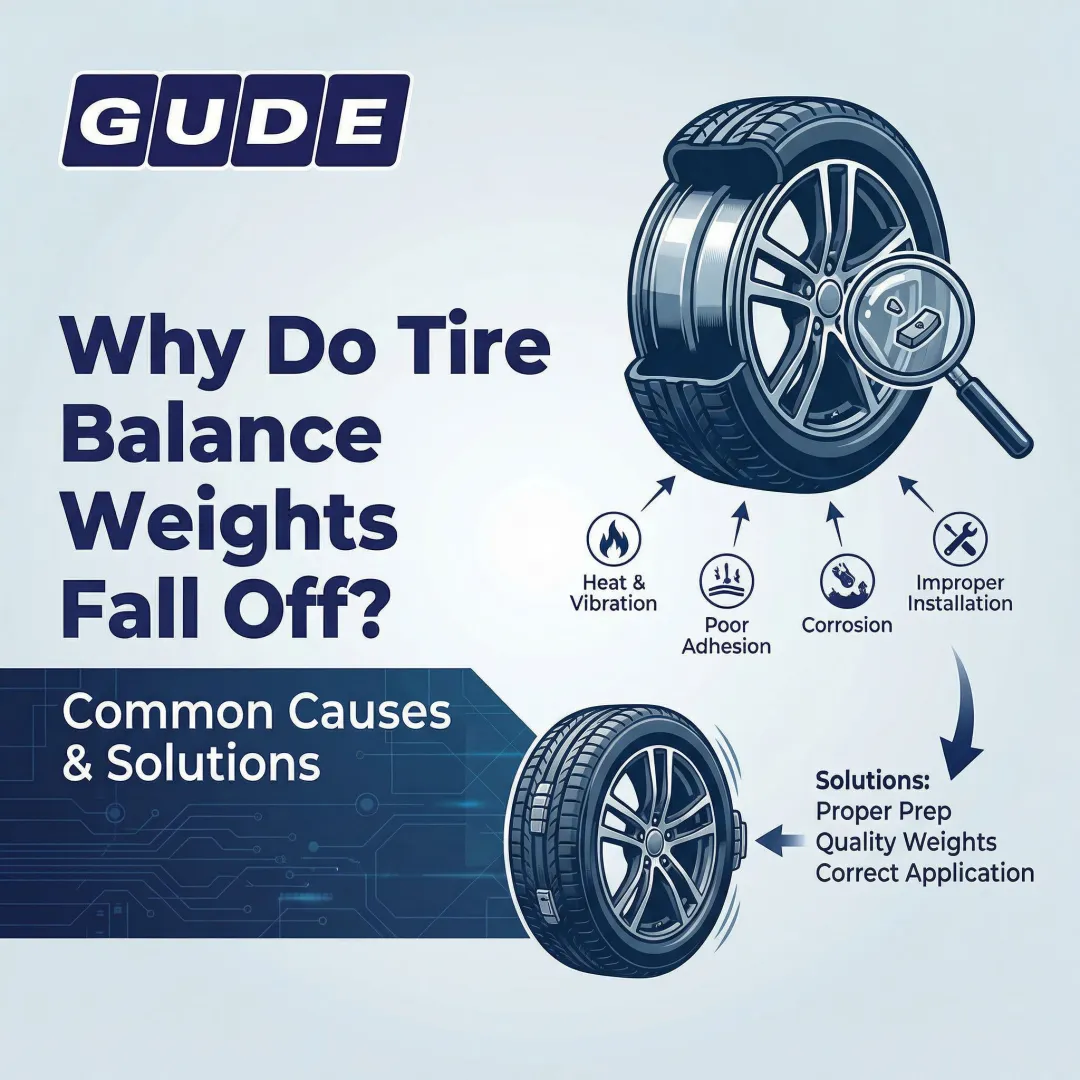
- Wheel balance weights fall off due to road impacts, adhesive breakdown, corrosion, and improper installation—not random road wear
- A missing balance weight immediately disrupts wheel equilibrium, causing vibration, uneven tire wear, and added strain on suspension components
- Watch for steering wheel vibration at 50–70 mph, irregular tread wear patterns, and rhythmic thudding sounds
- Prevention centers on proper surface prep, selecting the right weight type and material, and following rebalancing intervals
- Using corrosion-resistant, lead-free wheel weights cuts the risk of weight loss between service visits
Common Causes of Tire Balance Weight Wear-Off
Tire balance weight wear-off rarely traces back to a single event. In most cases, one or more compounding factors — road impacts, adhesive breakdown, surface contamination, or installation errors — combine to pull a weight loose between service visits. Clip-on and adhesive weights fail differently, and knowing why each type lets go is the first step toward preventing it.
Road Impact and Physical Dislodgment
Striking potholes, curbs, or road debris generates sudden shock force that can snap clip-on weights off the rim flange or shear adhesive-backed weights from the wheel surface. Heavier wheels and low-profile tire setups are especially vulnerable because they transmit more impact energy directly to the weight mounting point rather than absorbing it through sidewall flex.
Common real-world scenarios include:
- Highway debris strikes at speed
- Speed bumps taken too fast without slowing
- Off-road driving over rocks or uneven terrain
- Curb strikes during parking maneuvers
- Pothole impacts that compress the tire suddenly
Weights that look secure immediately after impact may have sustained micro-damage to the clip tension or adhesive bond — delayed failure within a few hundred miles is common.

Adhesive Degradation on Stick-On Weights
The adhesive backing on stick-on (tape) weights breaks down from three main stressors:
- Heat cycling — engine bay proximity and radiated road heat cause repeated expansion and contraction, weakening the adhesive bond over time
- UV exposure — sunlight accelerates degradation, especially on open-spoke wheels where direct light reaches the mounting surface
- Chemical contact — tire dressings, brake dust, road salt, and deicing agents all attack the adhesive from outside
Research shows that generic brake cleaners used during installation leave oily residues that prevent pressure-sensitive adhesives from achieving the required 80-85% wet-out contact area, compromising retention from day one.
This degradation is gradual and often invisible: the weight may appear secure during visual inspection until a vibration or impact causes separation.
Corrosion and Surface Contamination at the Mounting Point
Rim corrosion, rust, grease, old adhesive residue, and rim coatings (powder coat, chrome) all create an unstable mounting surface that accelerates fretting and weight loss. For clip-on weights, corrosion at the rim flange creates an uneven surface that prevents the clip from seating fully, reducing retention force below the ISO 13988 minimum requirements.
For adhesive weights, surface contamination prevents the adhesive from bonding directly to the metal substrate. Even fine brake dust particles create bridges that reduce contact area and bond strength.
This cause is especially prevalent in:
- Regions with heavy road salt use during winter months
- High-humidity coastal areas where oxidation accelerates
- Vehicles with older alloy or steel wheels showing visible oxidation
- Wheels with aftermarket coatings applied over factory finishes
Improper Installation Practices
Installation errors compromise retention from the start, often causing failure within just a few hundred miles. Common mistakes include:
- Incorrect clip size for the rim profile — forcing a standard P-profile clip onto an MC or FN rim prevents full seating
- Insufficient surface cleaning — applying adhesive weights over brake dust, old adhesive residue, or tire lubricant
- Wrong weight type for wheel material — placing steel clips on soft aluminum alloy rims can gouge the flange and lose tension
- Inadequate adhesive dwell time — pressure-sensitive adhesives require a minimum application temperature of 50°F–60°F (10°C–15°C) to achieve proper viscous flow
- Pressing adhesive weights without adequate force — insufficient pressure prevents the adhesive from wetting out across the full contact area
In a rushed or high-volume shop environment, these shortcuts are easy to make. A weight applied without proper surface prep or adequate pressure may hold initially but fail as soon as the vehicle hits highway speeds.
What Happens When Balance Weights Fall Off During Driving
A missing weight—even a small one—immediately shifts the mass distribution of the wheel-tire assembly, causing it to spin off-center. This creates a dynamic imbalance that generates centrifugal force with every rotation. The sensitivity of modern wheel-tire assemblies means that losing as little as 10–15 grams (0.35–0.53 oz) creates measurable vibration above 55 mph.
Left unaddressed, the damage cascades:
- Accelerated and uneven tire tread wear — unbalanced tires can reduce tread life by 20-25% in severe cases, with cupping and patchy wear patterns appearing within a few thousand miles
- Increased stress on wheel bearings and suspension joints — a 20% load increase from sustained vibration reduces wheel bearing L10 life by 46%
- Reduced fuel efficiency — rolling resistance changes from the bouncing tire increase fuel consumption
- Potential loss of vehicle control — severe vibration at highway speeds can compromise steering response and braking effectiveness
Warning Signs That a Balance Weight Has Detached
**New or returning steering wheel vibration** is the most immediate and common symptom. It increases with speed and peaks between 50–70 mph, where the unbalanced wheel's rotational frequency matches the suspension's natural rebound frequency. That resonance effect is why the vibration feels disproportionately severe in that speed range.
Uneven or patchy tread wear is the longer-term consequence of that same hopping motion. It shows up as random spots around the circumference—distinct from the edge wear caused by alignment issues—because the wheel is making uneven contact with the road as it rotates.
Secondary indicators include:
- Rhythmic thudding or humming sound from one corner of the vehicle
- Increased ride harshness on smooth roads that were previously comfortable
- Floorboard vibration felt through the seat or pedals
These symptoms should prompt immediate inspection rather than waiting for the next scheduled service. Every mile driven with a missing weight adds measurable wear to bearings and tread that a rebalance alone won't reverse.
How to Prevent Tire Balance Weight Wear-Off
Prevention is a combination of correct installation technique, material selection, maintenance scheduling, and technician awareness—not simply rebalancing more often. Each element addresses a specific failure mode.
Thorough Surface Preparation Before Weight Application
Clean the rim mounting area completely before applying any weight. For adhesive weights, remove old adhesive residue, brake dust, corrosion, and any coatings using an appropriate solvent—a 50:50 mix of isopropyl alcohol (IPA) and water, or a dedicated prep solvent like 3M Surface Prep 2000. Never use brake cleaner; it leaves oily residues that actively degrade adhesive bonds.
For clip-on weights, ensure the rim flange is free of scale, corrosion, and deformation. Use a non-marring abrasive pad if necessary to create a clean, uniform mounting surface.
A contaminated surface reduces adhesive bond strength dramatically regardless of weight quality. Skipping surface prep is the leading cause of early detachment — no amount of weight quality compensates for it.
After cleaning, allow adequate flash-off time for the solvent to completely evaporate. Applying weights to a damp surface traps moisture under the adhesive, preventing proper wet-out.
Selecting the Correct Weight Type and Material for the Wheel
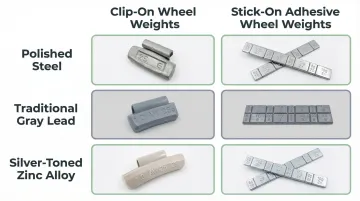
Match weight type to wheel material and rim profile. Clip-on weights work best for steel wheels with exposed flanges, while adhesive weights are preferred for alloy wheels with delicate finishes or hidden rim profiles. Select weights rated for the specific rim profile (GUDE series: P, MC, T, AW, FN, IAW) to ensure secure clip seating.
Material matters beyond fit. Lead-free zinc or steel weights—such as those manufactured by GUDE Corp to ISO9001 standards—resist corrosion and hold their shape under the clip. Lead is softer: it deforms over time, loosening grip and accelerating rust at the mounting point. Shops that switch to quality lead-free weights consistently see fewer comebacks and longer intervals between rebalancing services.
Performing Post-Installation Verification Checks
After mounting, physically verify each weight is fully seated:
- Clip-on weights: Ensure the clip is fully engaged on the rim flange with no gaps or tilting
- Adhesive weights: Press with sufficient force (approximately 15 psi or 100 kPa) and adequate dwell time per manufacturer specification to achieve proper wet-out
This check should be a standard step at the end of every balancing job, and again at the first tire rotation after a new balance. Issues often surface within the first few thousand miles, and catching them during the first rotation prevents customer comebacks and component damage.
Following Scheduled Rebalancing Intervals and Trigger Events
Balance at every tire rotation, typically every 5,000–7,500 miles. Major tire manufacturers including Michelin, Bridgestone, and Goodyear recommend this interval for maintaining even wear and optimal performance.
Rebalance after these trigger events as well:
- Any flat tire repair
- Hitting a significant road hazard (pothole, curb, debris)
- Whenever steering vibration re-emerges
Don't wait for the next annual service. Weight loss is gradual — symptoms often don't appear until enough weight is gone to cause noticeable vibration. Logging trigger events and rebalance dates in the service record gives technicians a reliable basis for prioritizing which vehicles to check first.
Tips for Long-Term Prevention and Control
Implement these best practices as standing operational standards for any shop or fleet maintaining multiple vehicles:
- Inspect weights at every oil change — flag any weight with lifting edges, corrosion at the clip point, or displacement from its original position
- Audit technician installation quality — spot-check weights on recently serviced vehicles to reinforce proper adhesive application and clip selection
- Keep a service log — record which weight type and quantity was applied at each balancing event per vehicle; this makes it easier to identify patterns (e.g., specific rim types that consistently lose weights) and switch to better-suited products
- Use road force balancing equipment — where budget allows, these machines detect radial runout and force variation that accelerate weight stress, letting technicians fix root causes rather than just placement
Done consistently, these habits cut repeat balance complaints and give customers a reason to return.
Conclusion
Tire balance weight wear-off has specific, identifiable causes—road impacts, adhesive failure, corrosion, and installation errors—and each one can be substantially reduced through deliberate practice.
Proactive prevention (proper prep, right materials, regular checks) costs far less than premature tire replacement and suspension repairs. A $60–$80 rebalancing service is a fraction of the cost of replacing a wheel bearing prematurely damaged by sustained vibration.
That cost comparison makes the next steps straightforward. Start by auditing your current protocols:
- Evaluate weight selection to match wheel type and application
- Review surface prep procedures and verify technicians use appropriate solvents
- Switch to lead-free weights, which provide stronger corrosion resistance and longer retention than traditional options
Frequently Asked Questions
What could happen if wheel balancing weights fall off during driving?
Detached weights cause immediate wheel imbalance, leading to steering vibration, accelerated tire wear, and added stress on bearings and suspension components. At highway speeds, severe imbalance can compromise vehicle control and braking effectiveness, creating safety risks if left unaddressed.
How long should a tire balance last?
A proper balance typically lasts between 5,000 and 7,500 miles under normal driving conditions. However, it can be disrupted much sooner by potholes, curb strikes, or adhesive failure—which is why balancing at every tire rotation is recommended.
Can I drive with a missing balance weight?
Technically yes, but it risks progressive tire wear and suspension damage. The severity depends on how much weight was lost—at highway speeds, even a 10-gram imbalance can generate enough vibration force to wear tires unevenly within a few thousand miles.
How do I know if a balance weight has fallen off?
Start with a visual inspection of the wheel rim—a missing clip or empty adhesive patch is a clear sign. If nothing is visible, new steering wheel or floorboard vibration that worsens above 50 mph after a recent balance service is a strong indicator a weight has detached.
Are lead-free wheel weights better at staying on than lead weights?
Lead-free weights made from zinc or steel are harder and more corrosion-resistant than lead, meaning clips maintain a tighter grip over time and adhesive backing adheres more reliably to a non-oxidizing weight surface. In practice, this translates to fewer field reports of spontaneous detachment compared to traditional lead weights under the same driving conditions.
How much does it cost to replace missing balance weights?
Rebalancing a full set of four tires typically ranges from $60 to $80 at most tire shops, with individual weight replacement being a low-cost fix. Delaying the fix is where costs compound—premature tire replacement alone can run $400–$800, making prompt rebalancing the far cheaper outcome.