This guide covers the exact step-by-step process, what to prepare, the variables that determine success, how to choose the right weights for alloys, and the mistakes that cause comebacks.
TL;DR
- Alloy wheels must be balanced when new tires are mounted, after pothole impacts, or every 5,000–6,000 miles
- Use back-cone mounting with adhesive (tape-on) weights on exposed alloy faces; clip-on AW or IAW series weights belong on inner flanges where they stay hidden
- Enter three wheel dimensions accurately (distance, diameter, width) before spinning
- Most balance failures trace to improper mounting, incorrect dimensions, or poor weight placement, not equipment malfunction
How to Balance Alloy Wheels Step by Step
Step 1: Set Up and Calibrate the Wheel Balancer
Power on the balancer and allow it to complete its self-calibration cycle. Skipping this step produces inaccurate readings and forces you to chase weights through multiple spin cycles. Once calibrated, confirm the balancer is set to dynamic (two-plane) mode — this measures both radial and lateral forces and is the correct standard for alloy wheels on modern vehicles.
Step 2: Clean the Wheel Assembly Thoroughly
Remove all old wheel weights, embedded debris from the tread, and road grime from the inner barrel of the alloy wheel. Any leftover debris on the rim produces a false imbalance reading.
Use only plastic or nylon tools when scraping or cleaning alloy surfaces. Alloys are particularly vulnerable to surface damage compared to steel rims—metal scrapers will scratch the finish and compromise the wheel's appearance.
Step 3: Mount the Wheel Using the Back-Cone Method
For alloy wheels with thicker hub profiles, the back-cone method centers the wheel at the hub mounting face, reducing runout and improving balance accuracy. This differs from front-cone mounting, which is only appropriate when the inner surface cannot provide an accurate centering surface.
Mounting procedure:
- Place the appropriate centering cone on the shaft first
- Mount the wheel flush against the cone
- Secure with a protective rubber-ringed lock nut
- Verify the wheel is seated flush with no lateral movement when rotated by hand
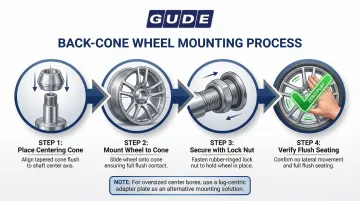
For lug-centric alloy wheels (where the center bore is larger than the vehicle hub), use a lug-centric adapter plate instead of a cone. This replicates how the wheel centers on the vehicle's hub. According to industry data, a mounting error of just 0.006 inches on a 36-pound wheel assembly generates a 0.5-ounce imbalance—enough to cause noticeable vibration.
Step 4: Enter the Three Wheel Dimensions
Input three required measurements:
- Distance – from the balancer faceplate to the inside rim edge
- Rim diameter – as indicated on the tire sidewall
- Rim width (J-size) – measured with a caliper
Without all three values, the balancer cannot correctly calculate weight placement for the inner and outer planes. Use the balancer's measuring arm for distance and diameter; measure J-size with a dedicated rim-width caliper. Even a small input error shifts weight position off-center and requires an additional correction spin.
Step 5: Spin, Read the Display, and Apply Weights
Lower the safety guard, start the spin cycle, and read the balancer display. The display shows the weight amount and clock position for both the inner and outer planes — target zero (or near-zero) on both.
For alloy wheels, apply adhesive (tape-on) weights on the inside barrel of the rim in the hidden placement position specified by the balancer's ALU mode. This keeps the finish clean without sacrificing balance accuracy.
After applying weights, perform a confirmation spin. If residual imbalance remains, use this correction logic:
- Weight at 12 o'clock: Add weight at that clock position in small increments until the reading clears
- Weight at 6 o'clock: Remove weight
- Weight elsewhere: Rotate the existing weight toward 12 o'clock — don't add more until position is corrected
What You Need Before Balancing Alloy Wheels
Preparation directly determines the accuracy of results. A properly calibrated machine and clean, correctly mounted wheel are prerequisites—not optional steps.
Equipment and Tooling Requirements
You'll need:
- A dynamic (computer) wheel balancer capable of ALU balancing modes
- Rim-width caliper
- Plastic-tipped or rubber-covered tools to prevent alloy surface damage
- Wheel weight hammer or applicator for adhesive weights
Weight Selection
Alloy wheels require adhesive tape-on weights for hidden placement. For wheels with a compatible flange, clip-on weights must be coated (nylon or alloy-bodied). This prevents galvanic corrosion between a steel clip and the aluminum rim surface.
Lead-free wheel weights are legally required in nine U.S. states and were banned in the EU in 2005. Service providers should confirm that stocked weight material is compliant with local regulations and rated for alloy applications.
GUDE Corp supplies ISO 9001-certified, lead-free coated steel wheel weights built for alloy fitments — available as adhesive rolls and pre-cut strip boxes for shops sourcing compliant inventory at volume.
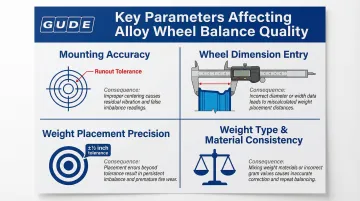
Key Parameters That Affect Balance Quality on Alloy Wheels
Even with professional equipment, four variables determine whether a balance job holds — or sends the vehicle back to the bay a week later.
Mounting Accuracy
Improper centering of the wheel on the balancer shaft introduces artificial runout that the machine interprets as real imbalance. The business-card test illustrates how sensitive this is — slide a card between the backing plate and wheel, and balance readings shift noticeably. An off-center mount produces false readings, which means unnecessary weights get added and the vibration persists after installation.
Wheel Dimension Entry
The balancer uses distance, diameter, and width to calculate the exact position on the rim lip where each weight should land. An error in any one of those values shifts the placement target. Incorrect dimension entry is one of the most common causes of comebacks — vehicles that return to the shop still vibrating after a fresh balance job.
Weight Placement Precision
Placement errors as small as half an inch from the indicated position reduce the corrective effect of the weight. This is especially critical on alloys using adhesive weights in a hidden inner location, where there's no visual confirmation and no easy re-check without a re-spin. Residual imbalance in either plane means additional spin cycles, more rework, and more time on the lift.
Weight Type and Material Consistency
Different weight materials — lead, steel, zinc alloy — have different densities, meaning the same physical piece can deliver a different corrective mass. Mixing material types mid-job, or using off-spec weights, means the amount applied may not match what the balancer calculated.
Consistent results come from consistent inputs. Weights manufactured to tight density tolerances, like GUDE Corp's ISO 9001-certified, lead-free coated steel weights produced by Toho Kogyo, ensure the mass applied matches the correction the balancer specified — reducing re-spins and comebacks across high-volume operations.
Choosing the Right Wheel Weights for Alloy Rims
Alloy rims require a different weight selection approach than steel. Using the wrong type risks galvanic corrosion, regulatory violations, or visible damage to a wheel finish that customers specifically paid for.
Adhesive (Tape-On) Weights
The preferred and most widely specified weight type for alloy wheels. Applied to the inner barrel in hidden placement mode, they preserve the wheel's appearance and adhere reliably through temperature cycling and road conditions.
- Clean and degrease the surface before application for maximum bond strength
- Use weights with an OEM-grade adhesive compound rated for long-term retention
- Choose gray or black finishes to match the wheel's interior aesthetics
GUDE Corp offers adhesive weights in 0.25oz increments up to 1.00oz, available in both continuous roll format (720 pieces) and pre-cut box format (144 pieces with 24 strips).
Clip-On Weights for Alloys
Standard steel clip-on weights are not recommended directly on alloy rims because bare steel in contact with aluminum causes galvanic corrosion and marks the rim. If clip-on weights are used on alloys that have a compatible flange, only coated or alloy-body clips should be used.
GUDE Corp's AW Clip-On Series (low-profile design for outer flange placement) and IAW Clip-On Series (hidden inner edge placement) feature lead-free coated steel construction specifically designed to prevent corrosion on aluminum rims.
Beads vs. Weights
Some shops market balance beads — loose beads placed inside the tire — as a DIY alternative to conventional weights. Beads can compensate for simple static imbalance, but they do not correct dynamic (two-plane) imbalance. Machine balancing remains the only reliable solution for both imbalance types.
The U.S. Tire Manufacturers Association (USTMA) does not endorse aftermarket balancing substances, and manufacturers warn that internal materials with moisture content greater than 3% will void tire warranties.
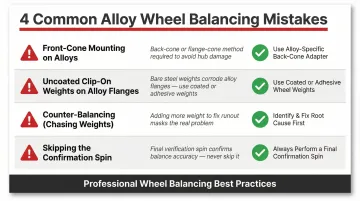
Common Mistakes When Balancing Alloy Wheels
Avoid these errors that cause comebacks and wasted time:
- Front-cone mounting on alloys: Using a front-cone setup on wheels with thick hub sections increases runout and produces inaccurate readings. The wheel may show zero on the machine but still vibrate on the vehicle. Use back-cone mounting instead.
- Uncoated clip-on weights on alloy flanges: Standard clip-on weights without a protective coating cause corrosion pitting on the rim's flange over time. Coated clip-on weights designed specifically for alloy wheels — such as AW or IAW series — prevent this damage.
- Counter-balancing (chasing weights): Adding multiple weight clusters in different positions instead of one weight at the correct location signals an underlying problem. If the balancer calls for weights more than twice, or at 90 degrees to the first placement, the machine is chasing weights — typically caused by improper centering, a bent rim, or debris inside the tire.
- Skipping the confirmation spin: The first spin shows where weights are needed. Only a re-spin after weight application confirms the wheel is actually balanced.
Conclusion
Balancing alloy wheels correctly depends on proper mounting (back-cone method), accurate dimension entry, and using the right weight type (adhesive, lead-free) placed precisely where the balancer indicates.
Most persistent vibration problems after balancing trace back to one of three causes: mounting error, an inaccurate measurement, or misplaced weights — not machine malfunction.
For service providers handling alloy wheels at volume, investing in the right consumables — specifically quality lead-free adhesive weights suited to alloy surfaces — is the foundation of consistent, comeback-free results. GUDE Corp's lead-free coated steel weights are manufactured by Toho Kogyo — the #1 wheel weight producer in Japan and #3 globally — and are available in wholesale and pallet quantities for tire shops, dealership groups, and fleet operations that need a reliable, high-volume supply.
Frequently Asked Questions
Do alloy wheels need wheel balancing?
Yes, alloy wheels must be balanced every time a new tire is mounted, after any significant impact, or at regular service intervals. Alloys are subject to the same weight distribution physics as steel rims and are not self-balancing.
How much does alloy wheel balancing cost?
Standard balancing typically runs $15 to $50 per wheel; road-force balancing (which uses a load-roller to simulate road contact) costs $20 to $40 per wheel. Prices vary by region and shop type.
What's better for balancing alloy wheels: beads or weights?
Machine-applied adhesive weights are the professional standard because they correct both static and dynamic imbalance in two planes. Beads only address static imbalance and cannot replicate a full dynamic balance result required for modern steering axles.
Do steel rims need to be balanced?
Yes, steel rims also require balancing and follow the same fundamental process, but typically use clip-on weights and the front-cone mounting method rather than the back-cone and adhesive weight approach used for alloys.
How often should alloy wheels be rebalanced?
Rebalance every 5,000–6,000 miles or with every tire rotation, plus after trigger events such as hitting a pothole, noticing steering vibration, or having a new tire mounted.
Can I balance alloy wheels at home?
Home balancing is possible with a portable balancer. Accurate results require the correct back-cone mounting method, precise dimension inputs, and proper adhesive weights—the same steps a professional shop follows.